Nx Meta Platfrom
This document provides detailed instructions for deploying and configuring the Nx Meta Platform on NVIDIA Jetson Orin devices. It covers installation for both server and client, methods for local camera RTSP streaming, and how to enable five types of detection events and monitoring methods on the client side.
1.Overview
Nx Meta Platform, developed by Network Optix, is a core Video Management System (VMS) that offers comprehensive video management, AI analytics, and cloud service solutions. The platform features a modular architecture and supports unified deployment from edge computing devices to the cloud.
Nx Meta Platform: Core Video Management System (VMS), includes:
● Nx Meta Server (AIBOX): Installed on Jetson as the server, responsible for device management, video recording, user permissions, and AI integration via plugins.
● Nx AI Manager Plugin: The core AI plugin acting as an inference engine for AI models, supports both CPU and GPU, and provides a rule engine.
● Nx Meta Client: User interface for remote access, server configuration, and viewing AI analytics results.
● Meta Cloud: For account management, device discovery, and license distribution.
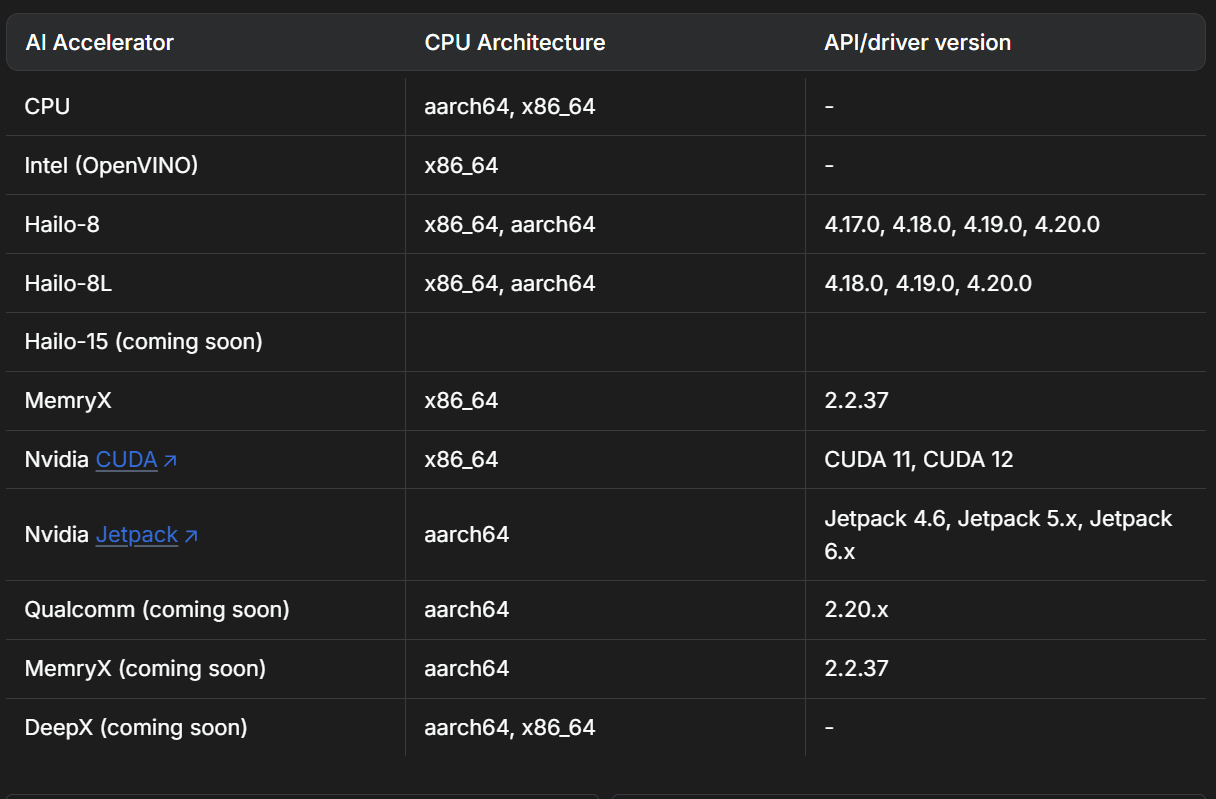
Supported devices:
2.Environment Preparation
Hardware Requirements
| Component | Requirement |
|---|---|
| Device | Jetson Orin (Nano / NX / AGX) |
| Memory | ≥ 8GB |
| Storage | ≥ 64GB |
| GPU | NVIDIA GPU with CUDA support |
| Camera | IMX219 |
Software Requirements
- Ubuntu 22.04
- NVIDIA CUDA Toolkit and drivers (JetPack 5.x/6.x pre-installed)
- Docker (optional, for containerized deployment)
3. Software Deployment
3.1 AIBOX Server Configuration
-
Connect the IMX219 camera and power on the AIBOX device.
-
Install system dependencies
sudo apt update
sudo apt upgrade -y
sudo apt-get install -y libgomp1 gdebi wget
- Download & install Nx Meta Server (ARM64 architecture)
# Download
wget https://updates.networkoptix.com/metavms/41290/arm/metavms-server-6.0.5.41290-linux_arm64.deb

# Install
sudo apt install -y ./metavms-server*.deb
- Install the AI Manager Plugin
sudo bash -c "$(wget -q -O - https://artifactory.nxvms.dev/artifactory/nxai_open/NXAIPlugin/install.sh)"
- Check if mediaserver is running
$sudo netstat -tlnp | grep 7001
tcp        0      0 0.0.0.0:7001            0.0.0.0:*               LISTEN      12566/mediaserver
tcp6       0      0 :::7001                 :::*                    LISTEN      12566/mediaserver
- Configure & start local camera RTSP streaming
# Install environment
sudo apt-get install python3-gi python3-gst-1.0 gir1.2-gst-rtsp-server-1.0

# Create streaming script
sudo vim  rtsp-server.py
sudo chmod +x rtsp-server.py

# Run the script (replace with your actual IP: rtsp://192.168.231.66:8554/cam)
python rtsp-server.py
Content of rtsp-server.py:
import gi
gi.require_version('Gst', '1.0')
gi.require_version('GstRtspServer', '1.0')
from gi.repository import Gst, GstRtspServer, GLib

Gst.init(None)

class RTSPServer:
    def __init__(self):
        self.server = GstRtspServer.RTSPServer()
        factory = GstRtspServer.RTSPMediaFactory()
        factory.set_launch(
            'nvarguscamerasrc ! video/x-raw(memory:NVMM),width=1280,height=720,framerate=30/1 ! nvv4l2h264enc ! rtph264pay name=pay0 pt=96'
        )
        factory.set_shared(True)
        self.server.get_mount_points().add_factory("/cam", factory)
        self.server.attach(None)

if __name__ == '__main__':
    RTSPServer()
    loop = GLib.MainLoop()
    loop.run()
3.2 Windows Client
-
Download Nx Meta Client and choose the appropriate version (e.g., X64, version 6.0.5.41290).
-
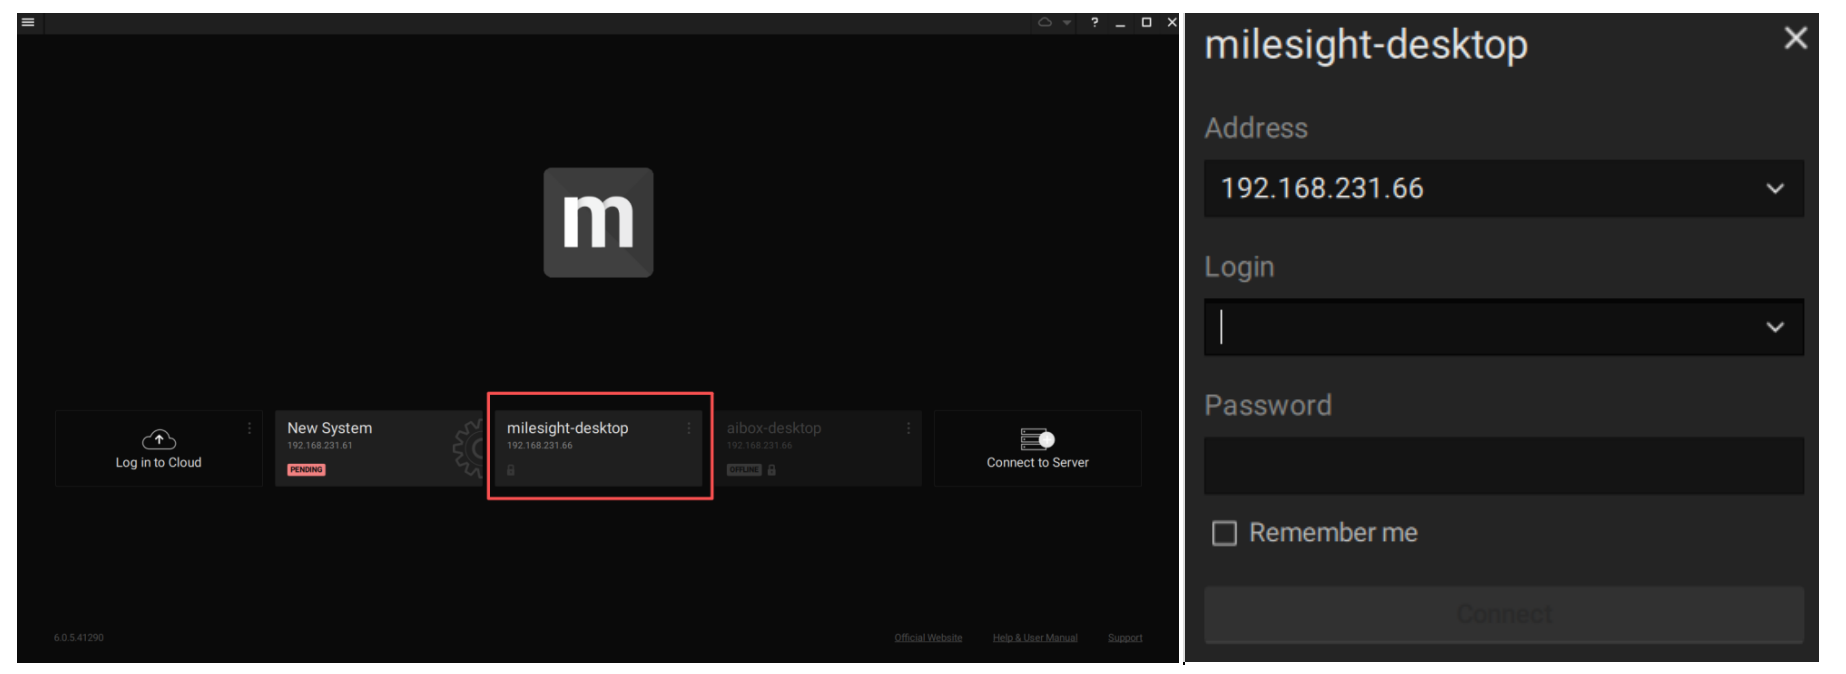
After installation, launch Nx Meta Client.
-
Once Nx Meta Server is installed on AIBOX, the client will automatically detect servers on the same network. (On first login, set up username and password; default is admin.)
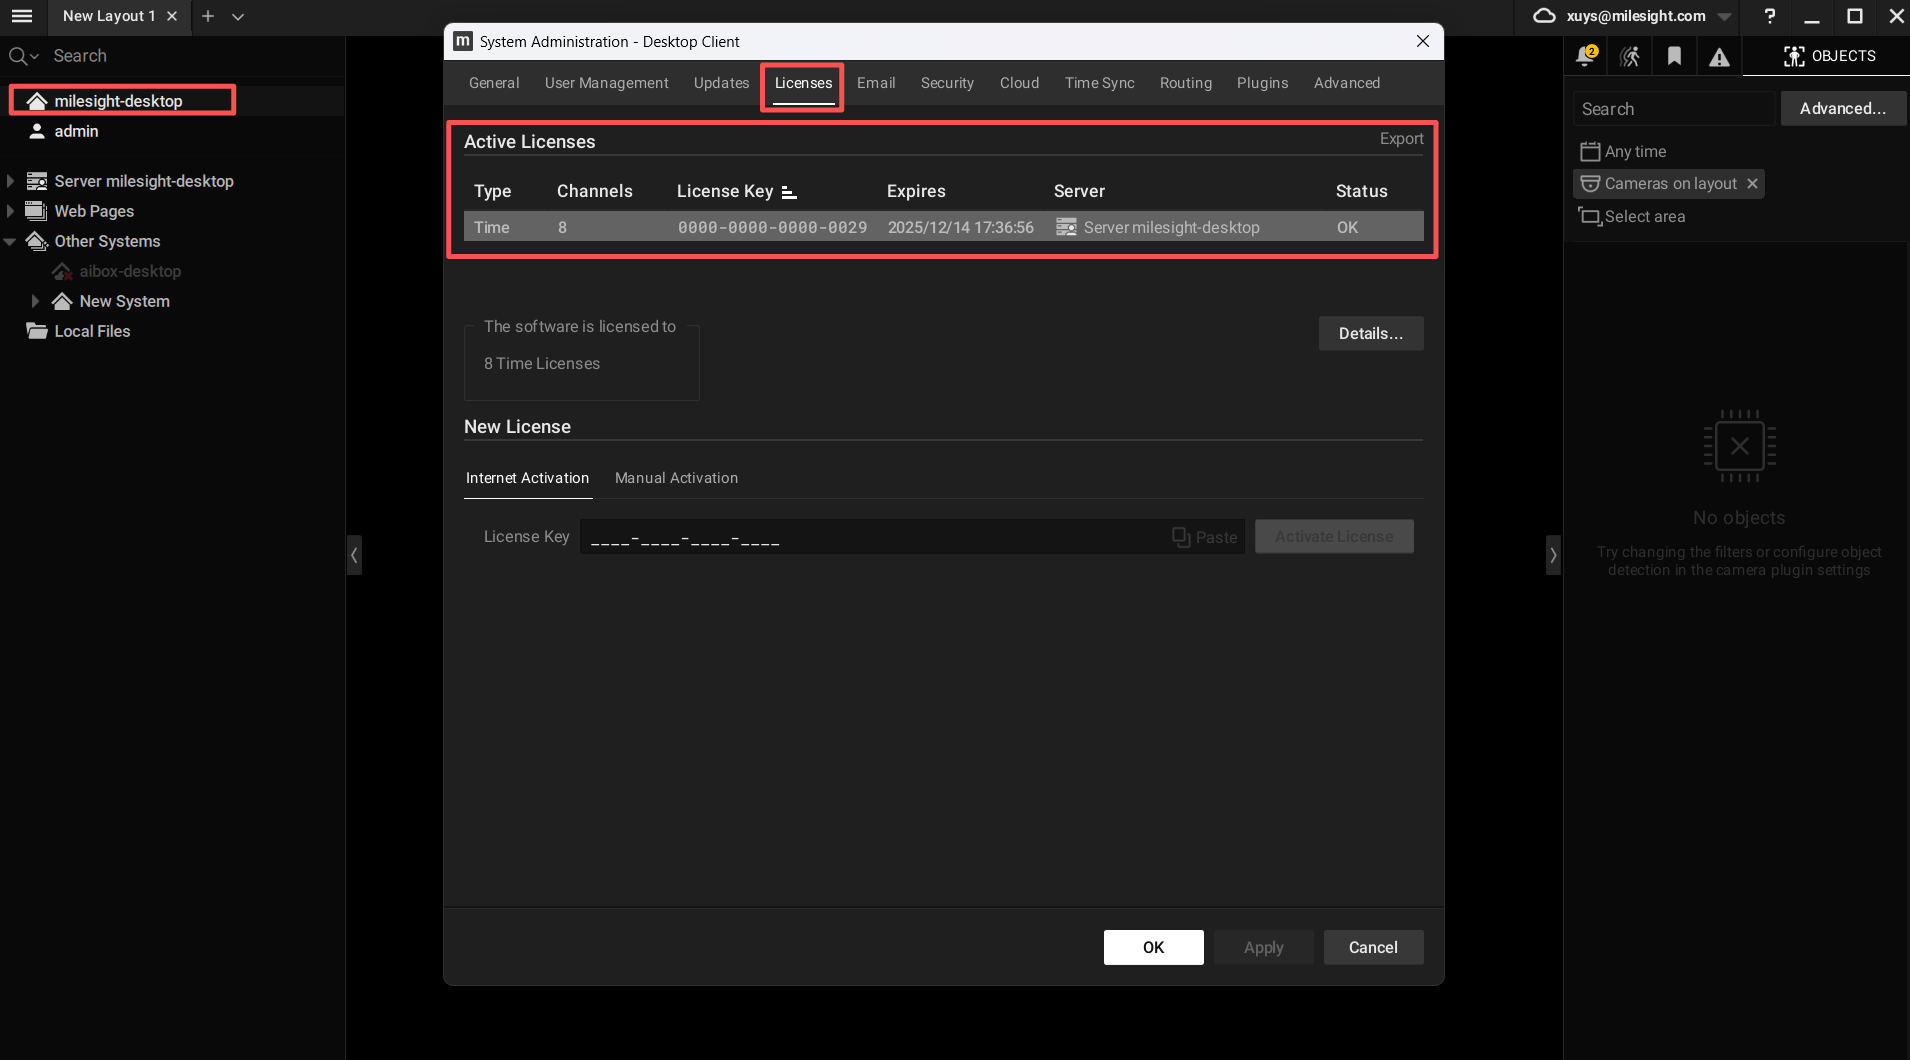
- Activate free licenses for the AIBOX server.
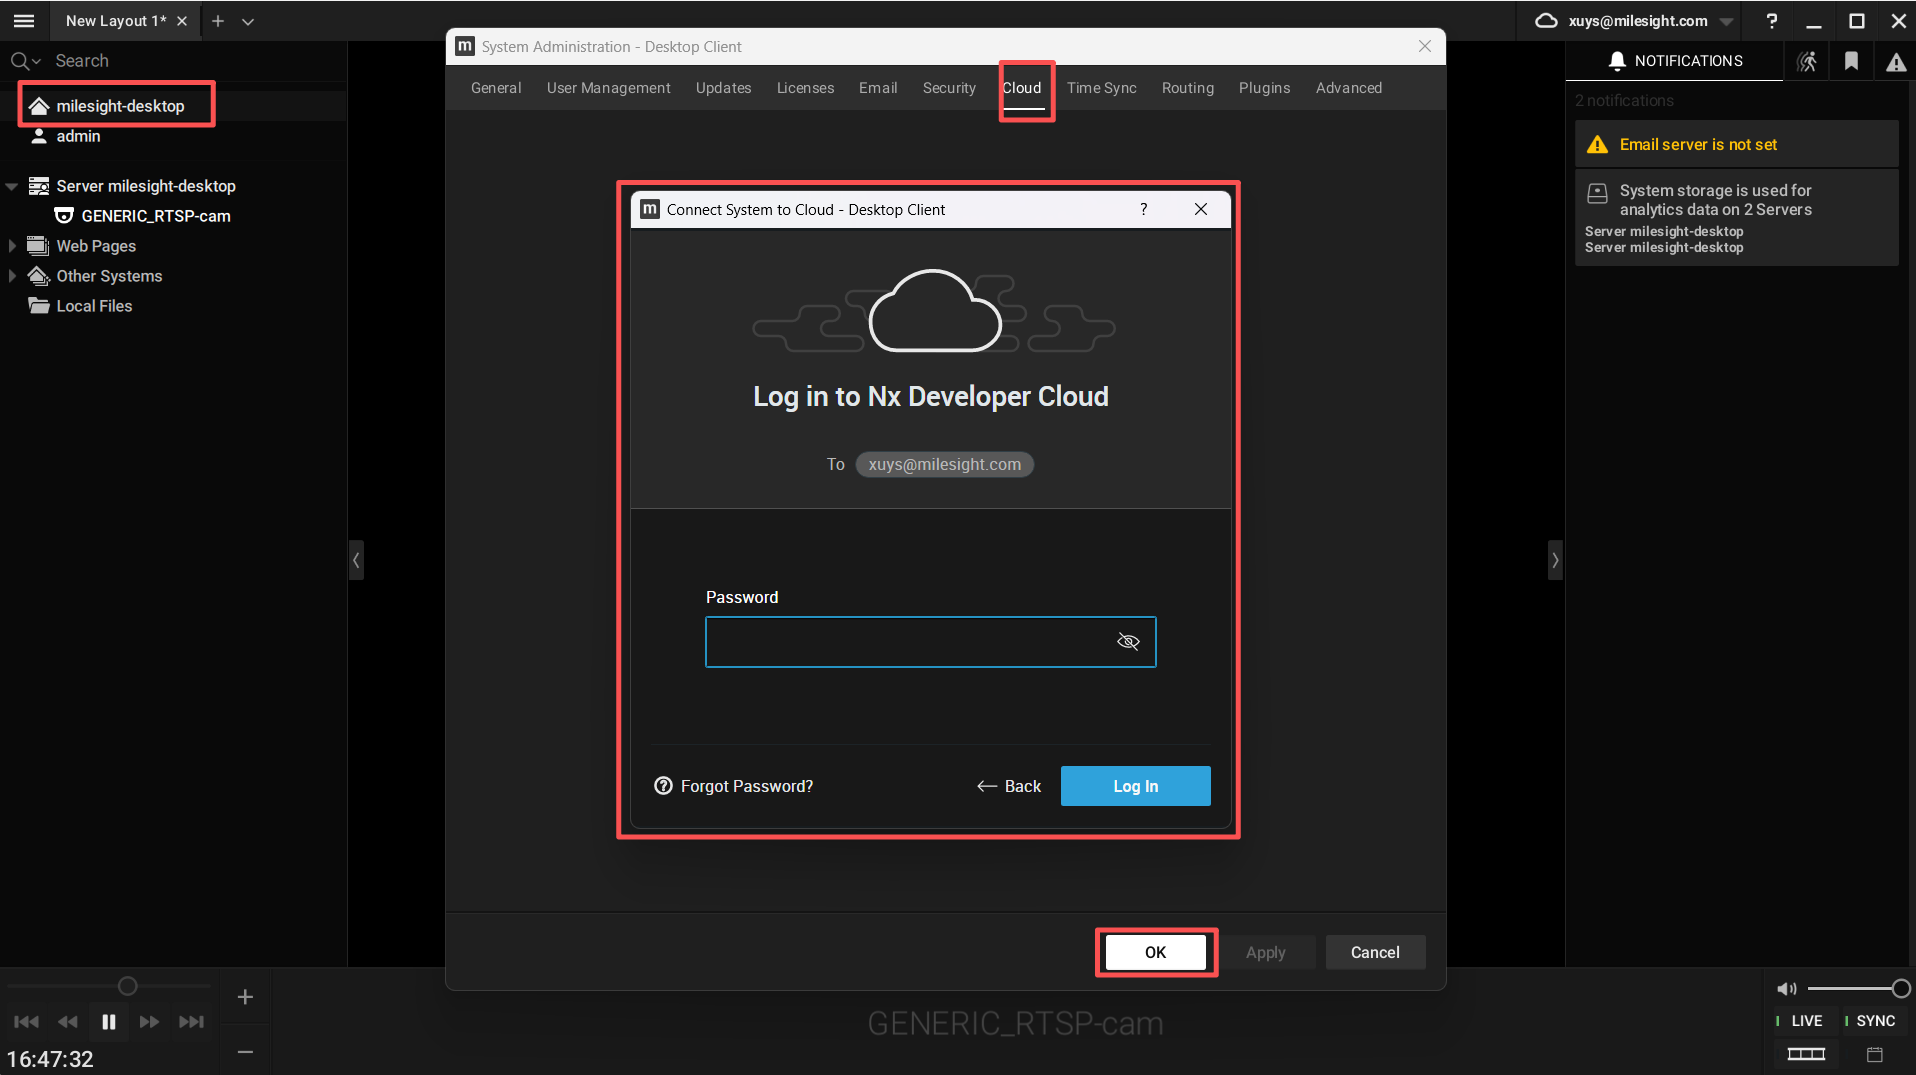
- Register a Meta Cloud account and log in.
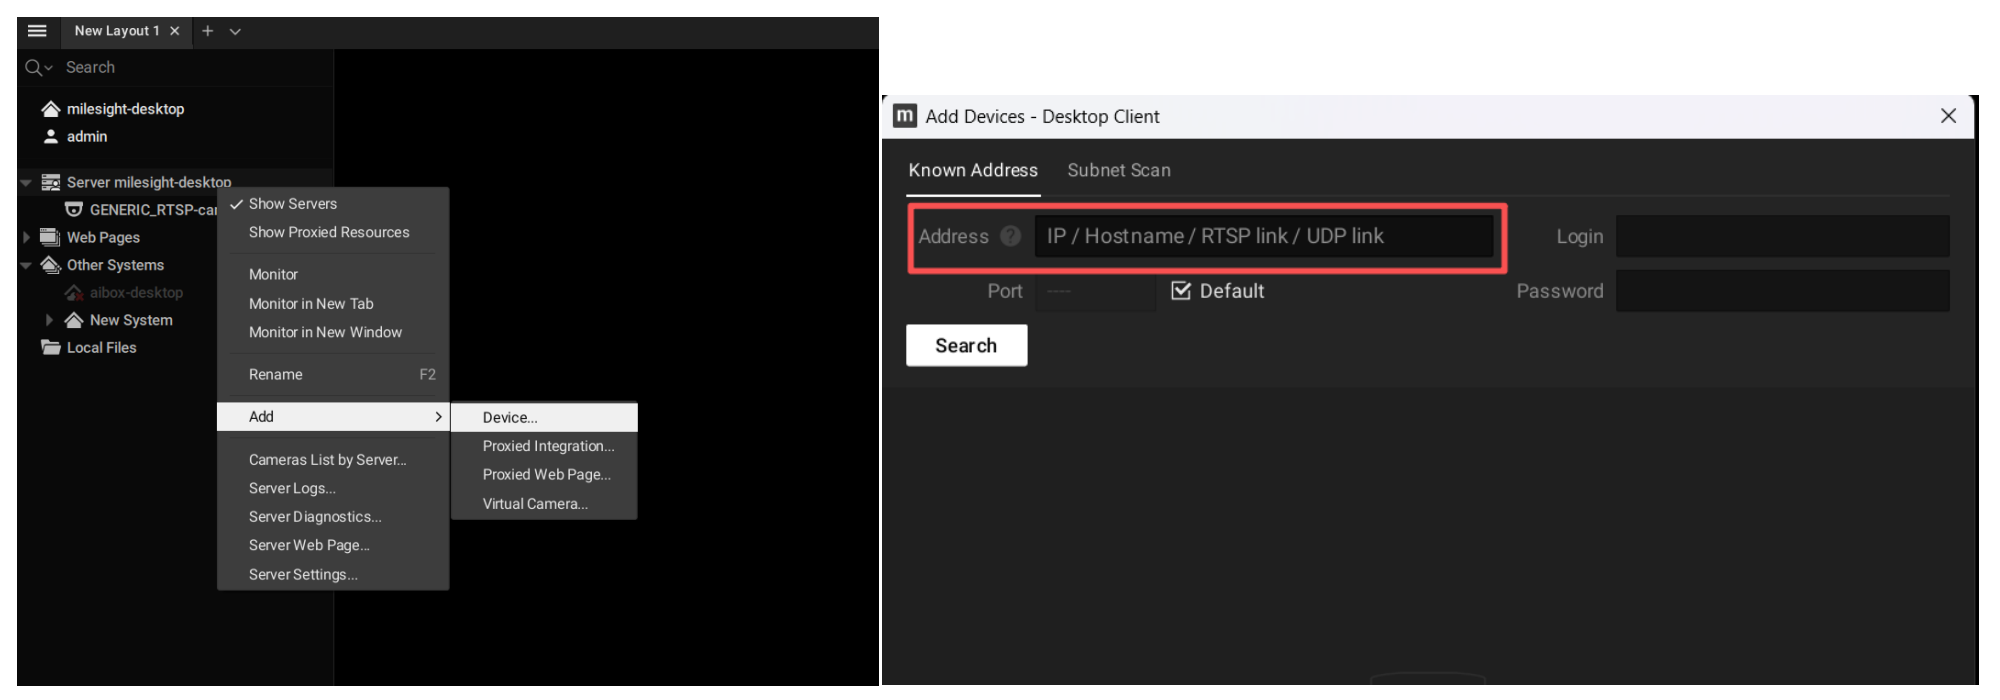
- Add camera device by entering the RTSP stream exported from AIBOX: rtsp://192.168.231.66:8554/cam
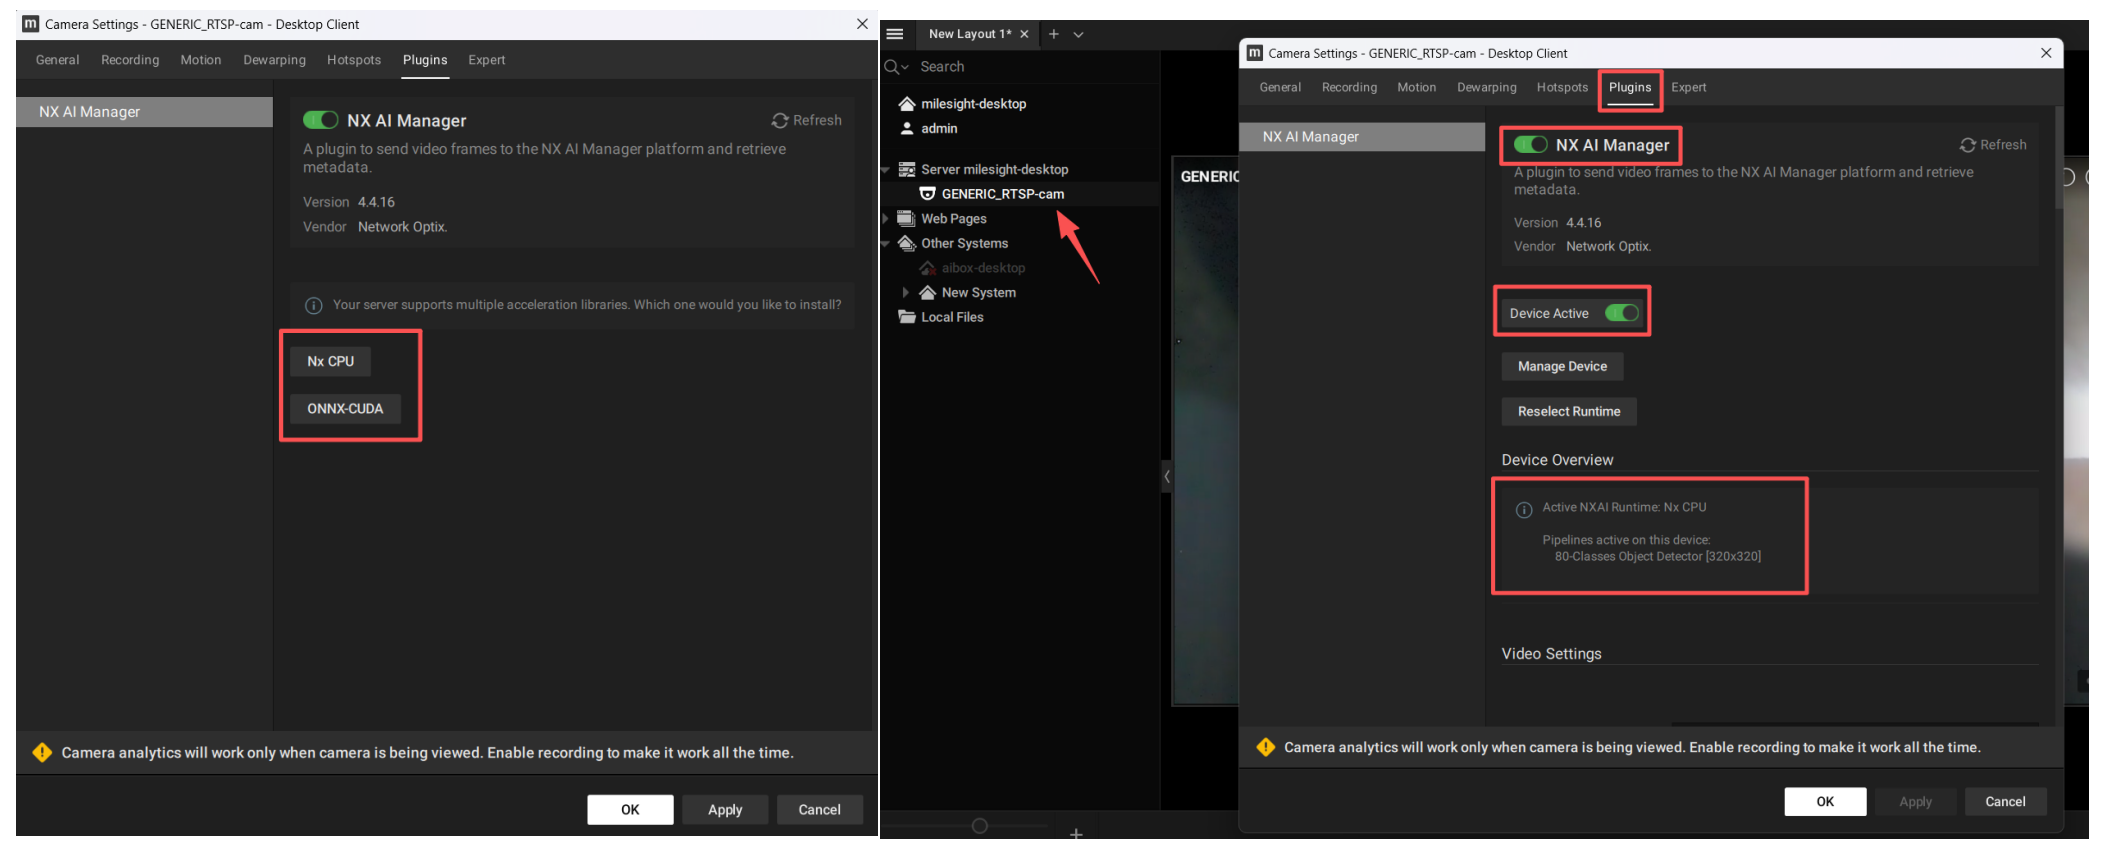
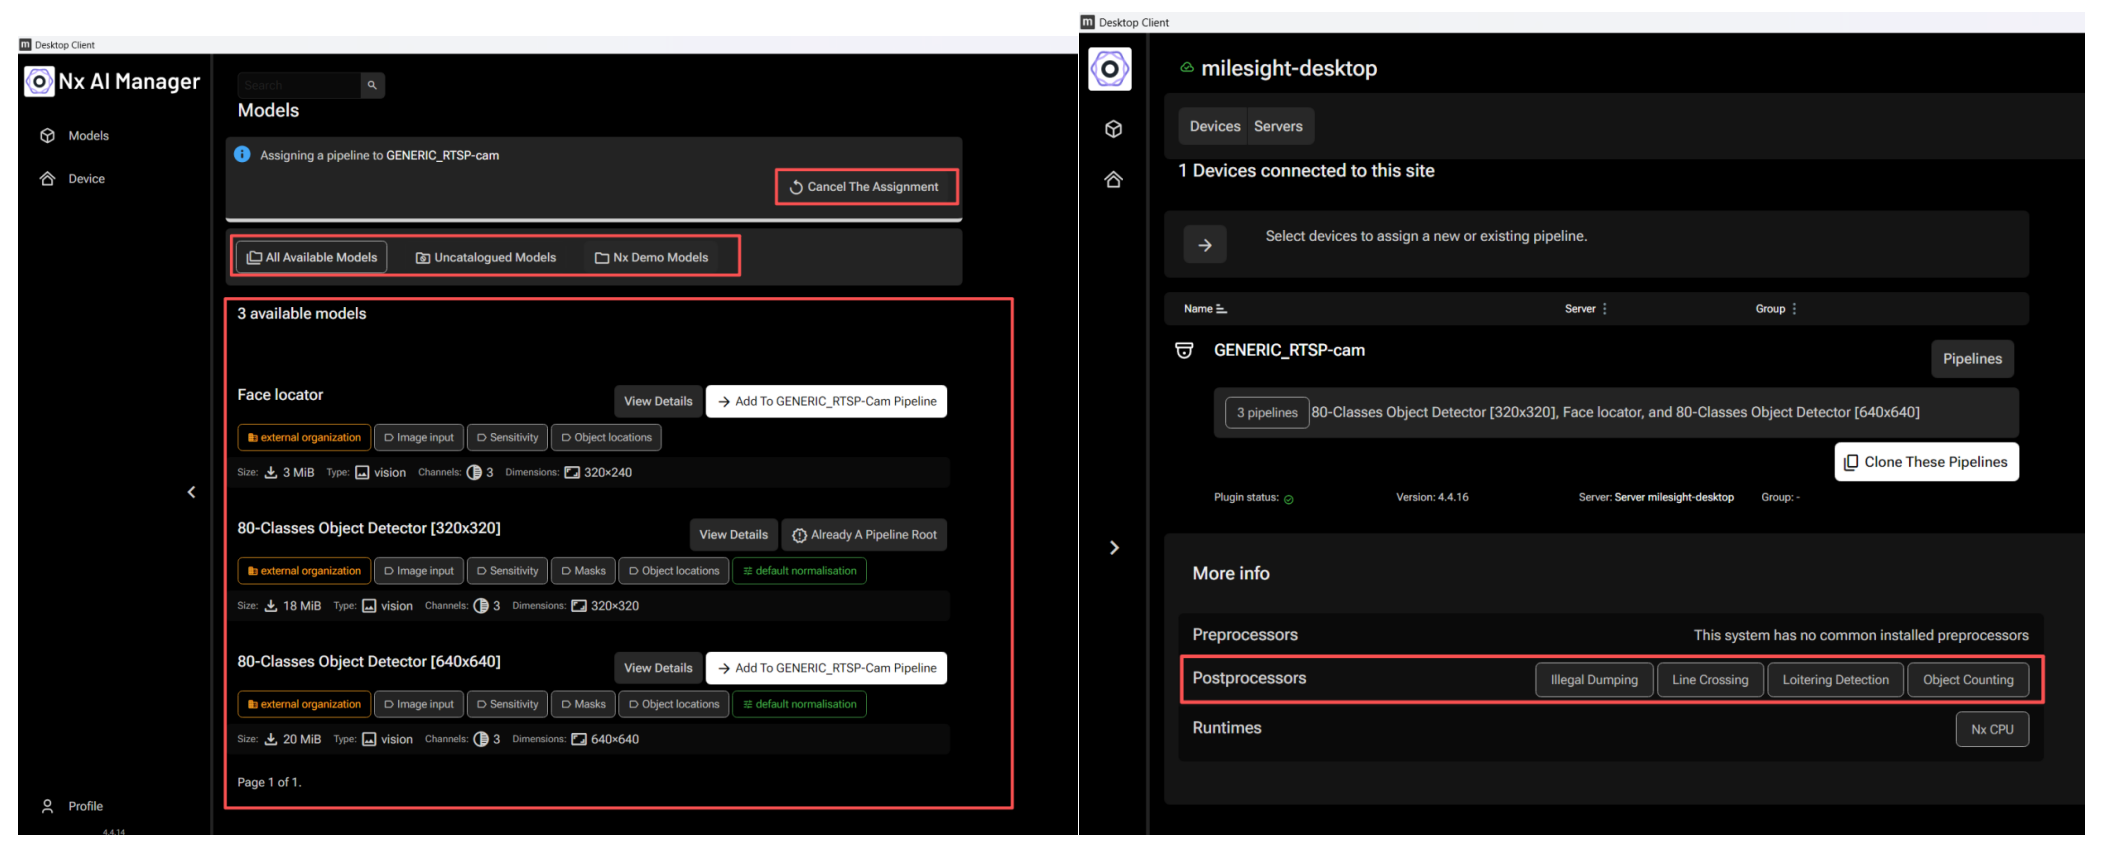
- Configure the camera and enable NX AI Plugins (both CPU and GPU modes are available, see Nx AI Manager plugin documentation).
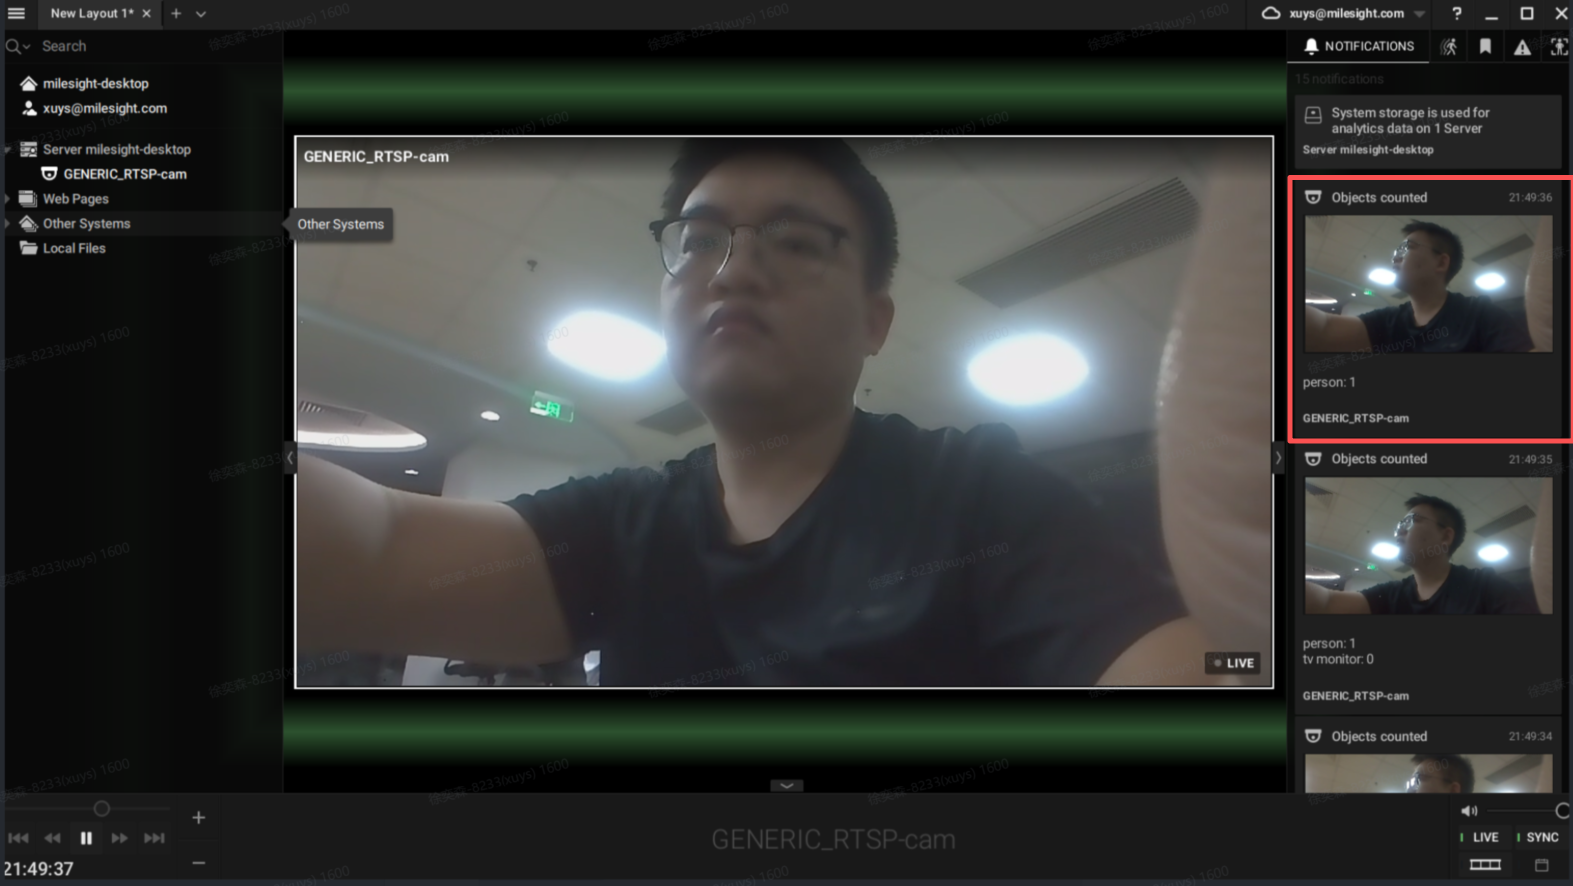
- Enable detection features including Object Detection, Face Detection, Line Crossing, Object Counting, and Loitering Detection. For example, Object Counting will identify and count items in the camera view, provide snapshots, and show pop-up alerts.
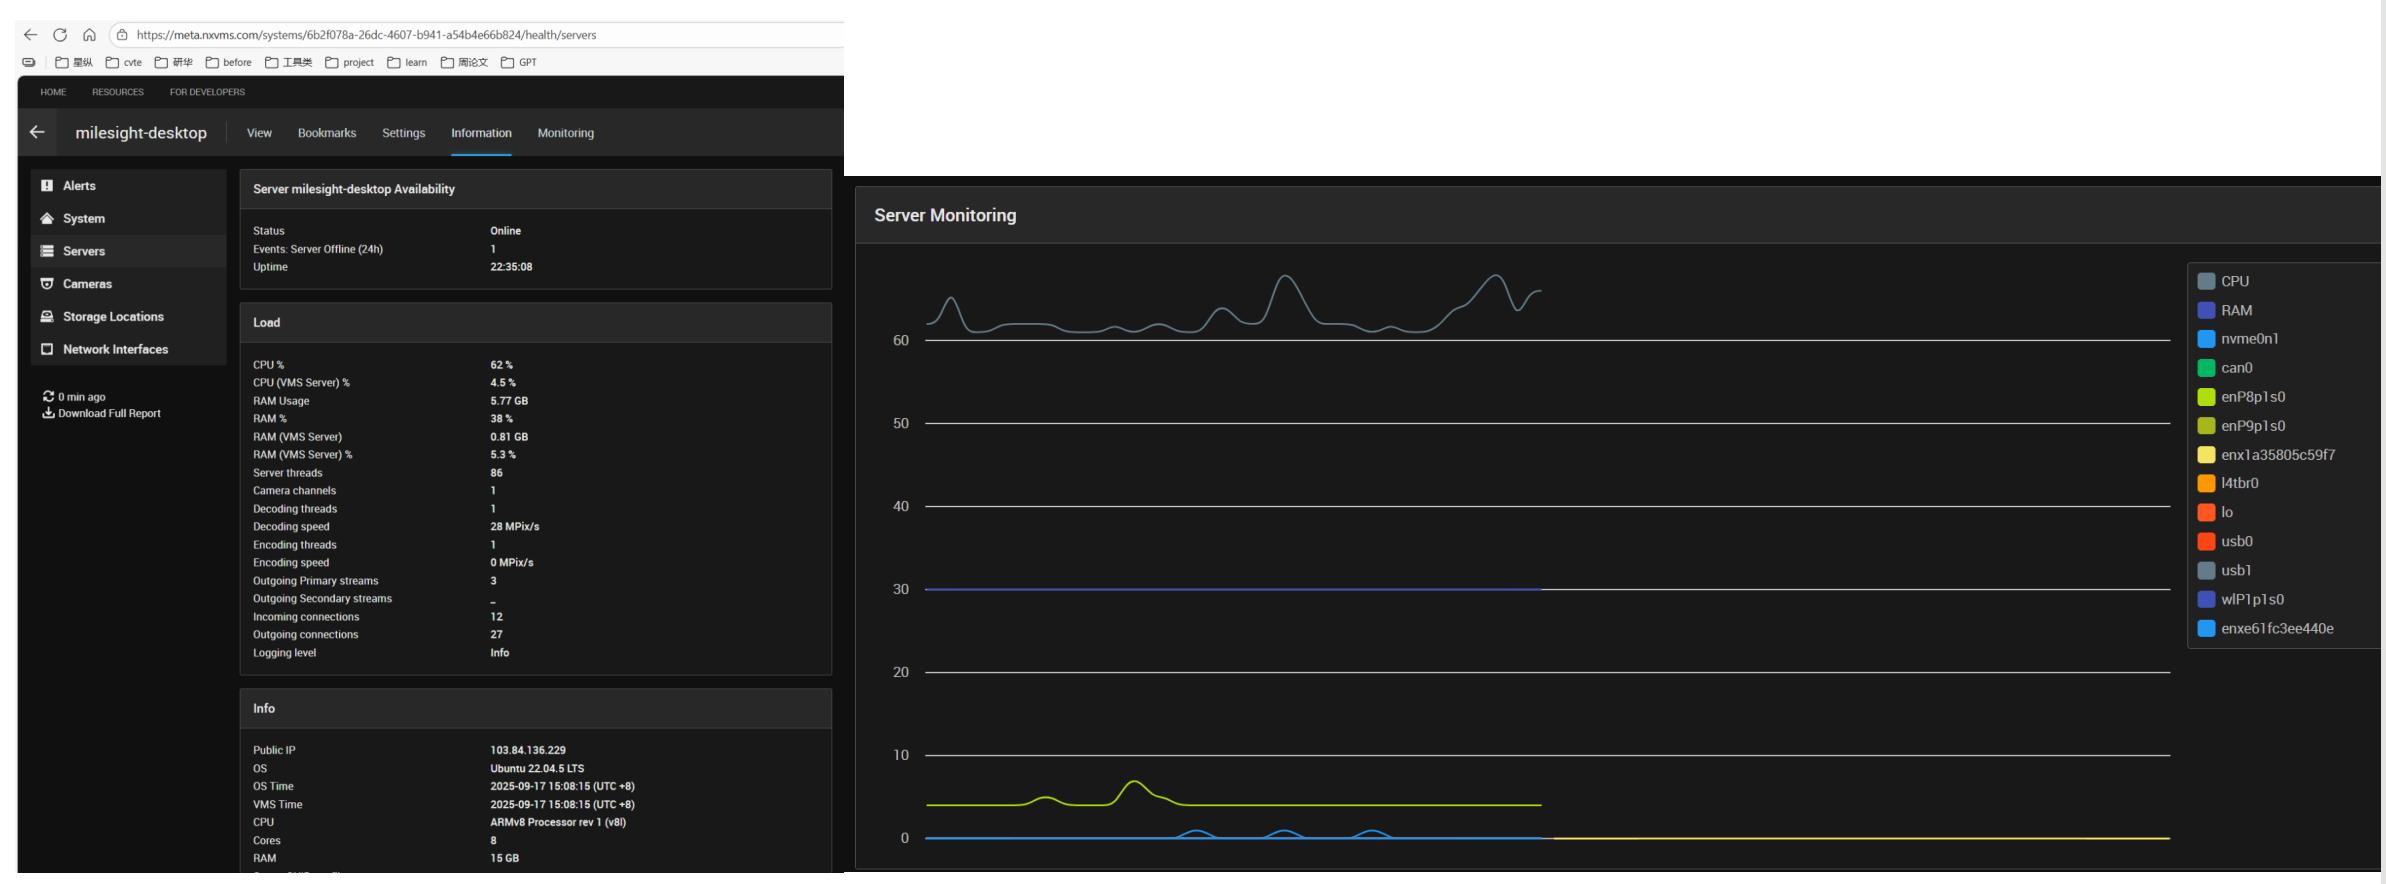
- Log in to cloud to monitor device performance and status.
- To switch detection types, select Manage Device in camera configuration, enter Nx AI Manager, and switch models (choose corresponding event such as Illegal Dumping, Line Crossing, Loitering Detection, Object Counting).
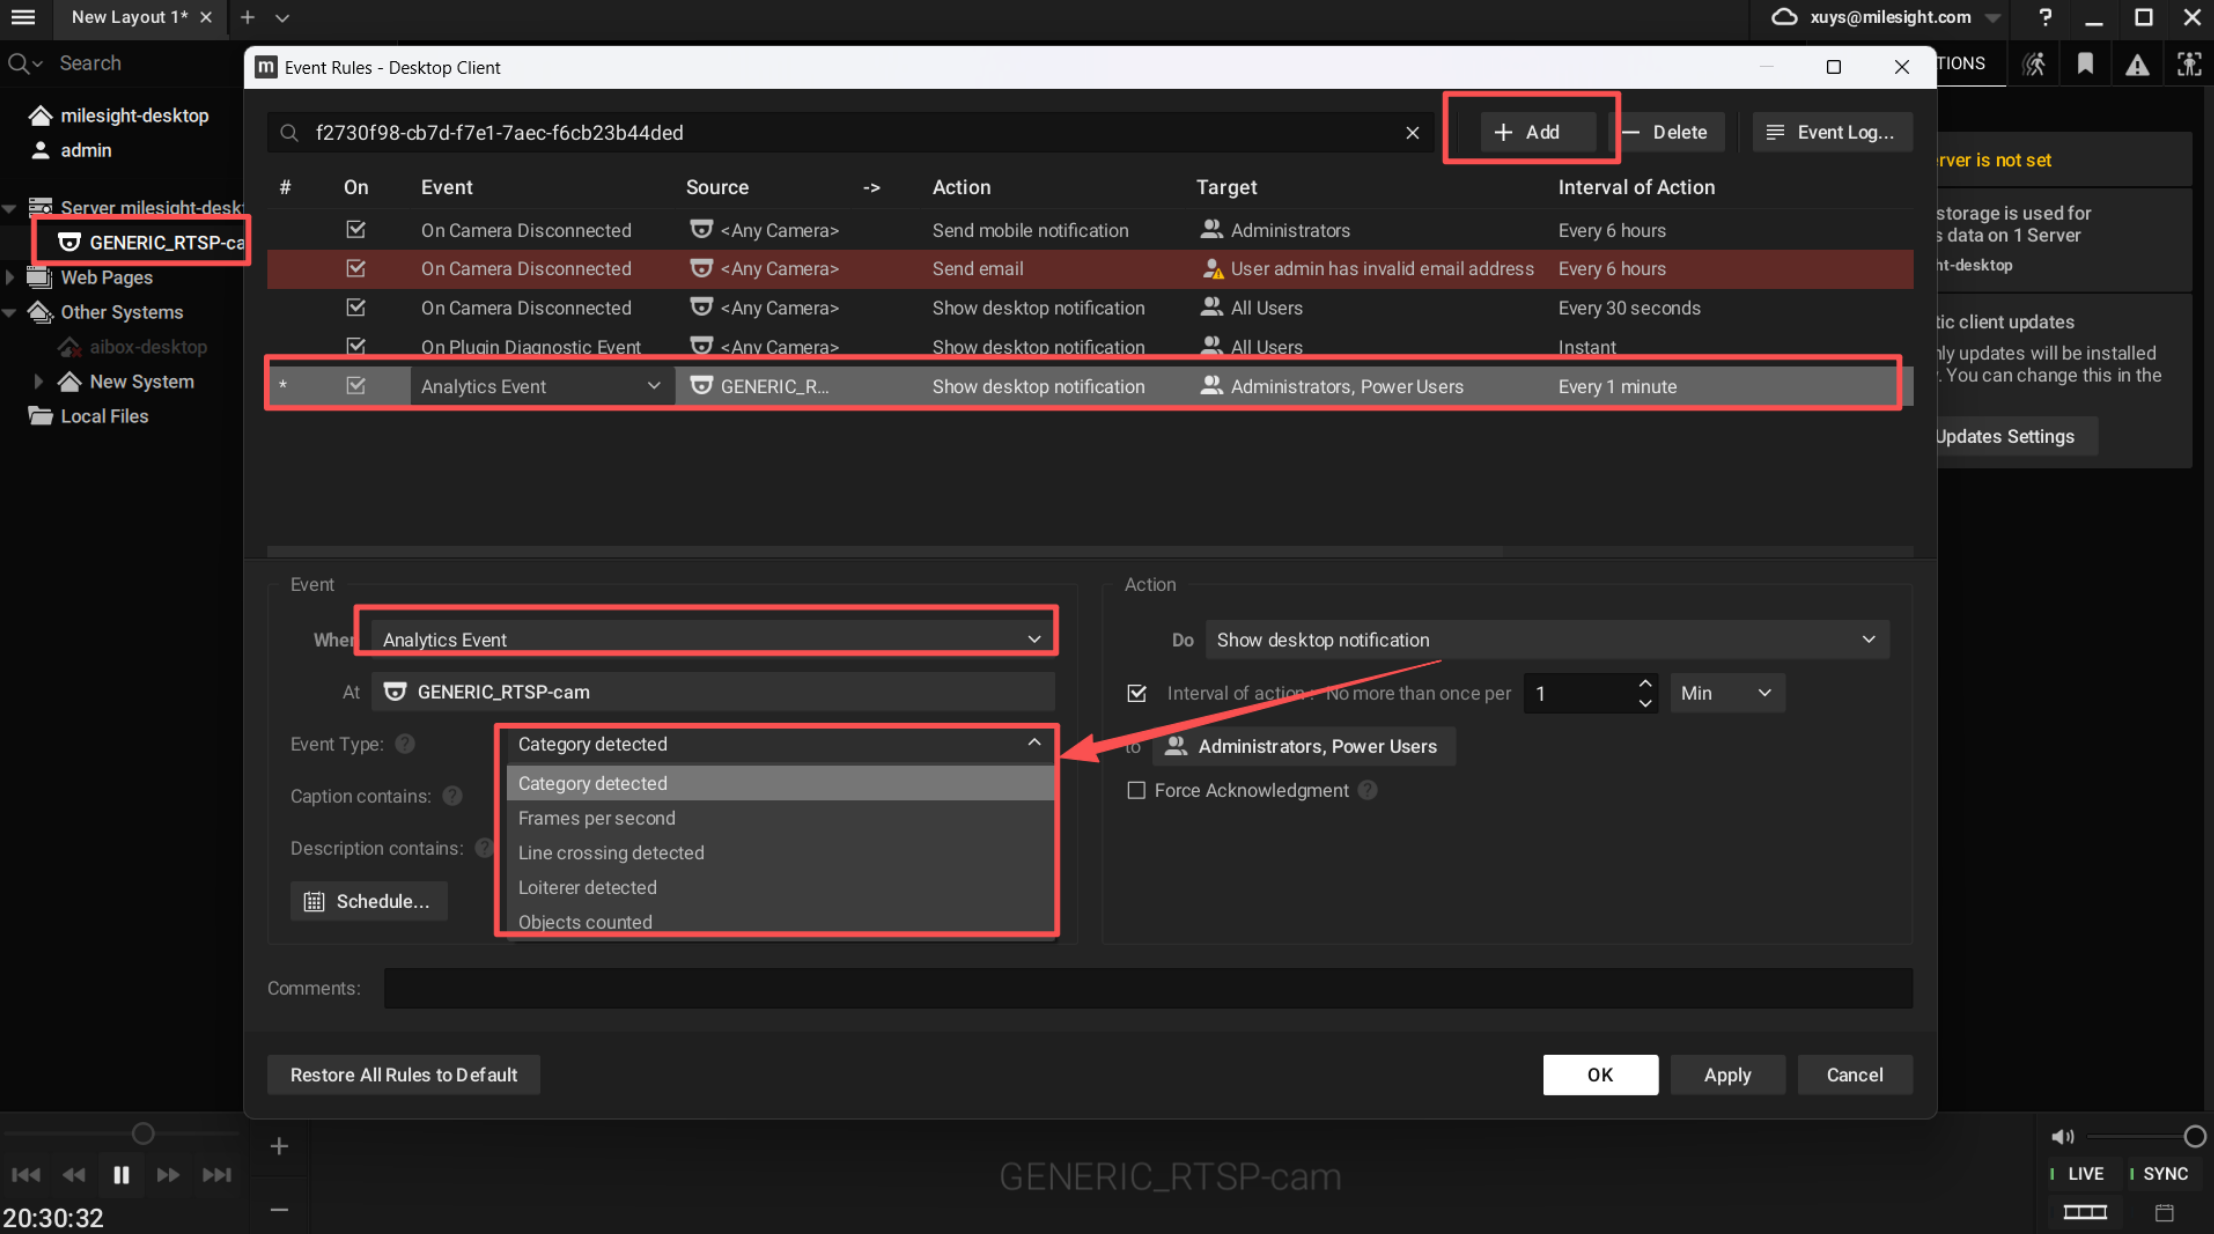
- Configure rule events: right-click on the camera, select "Add Rules", configure Analytics Event, and choose the specific detection event.
4. Teachable Machine
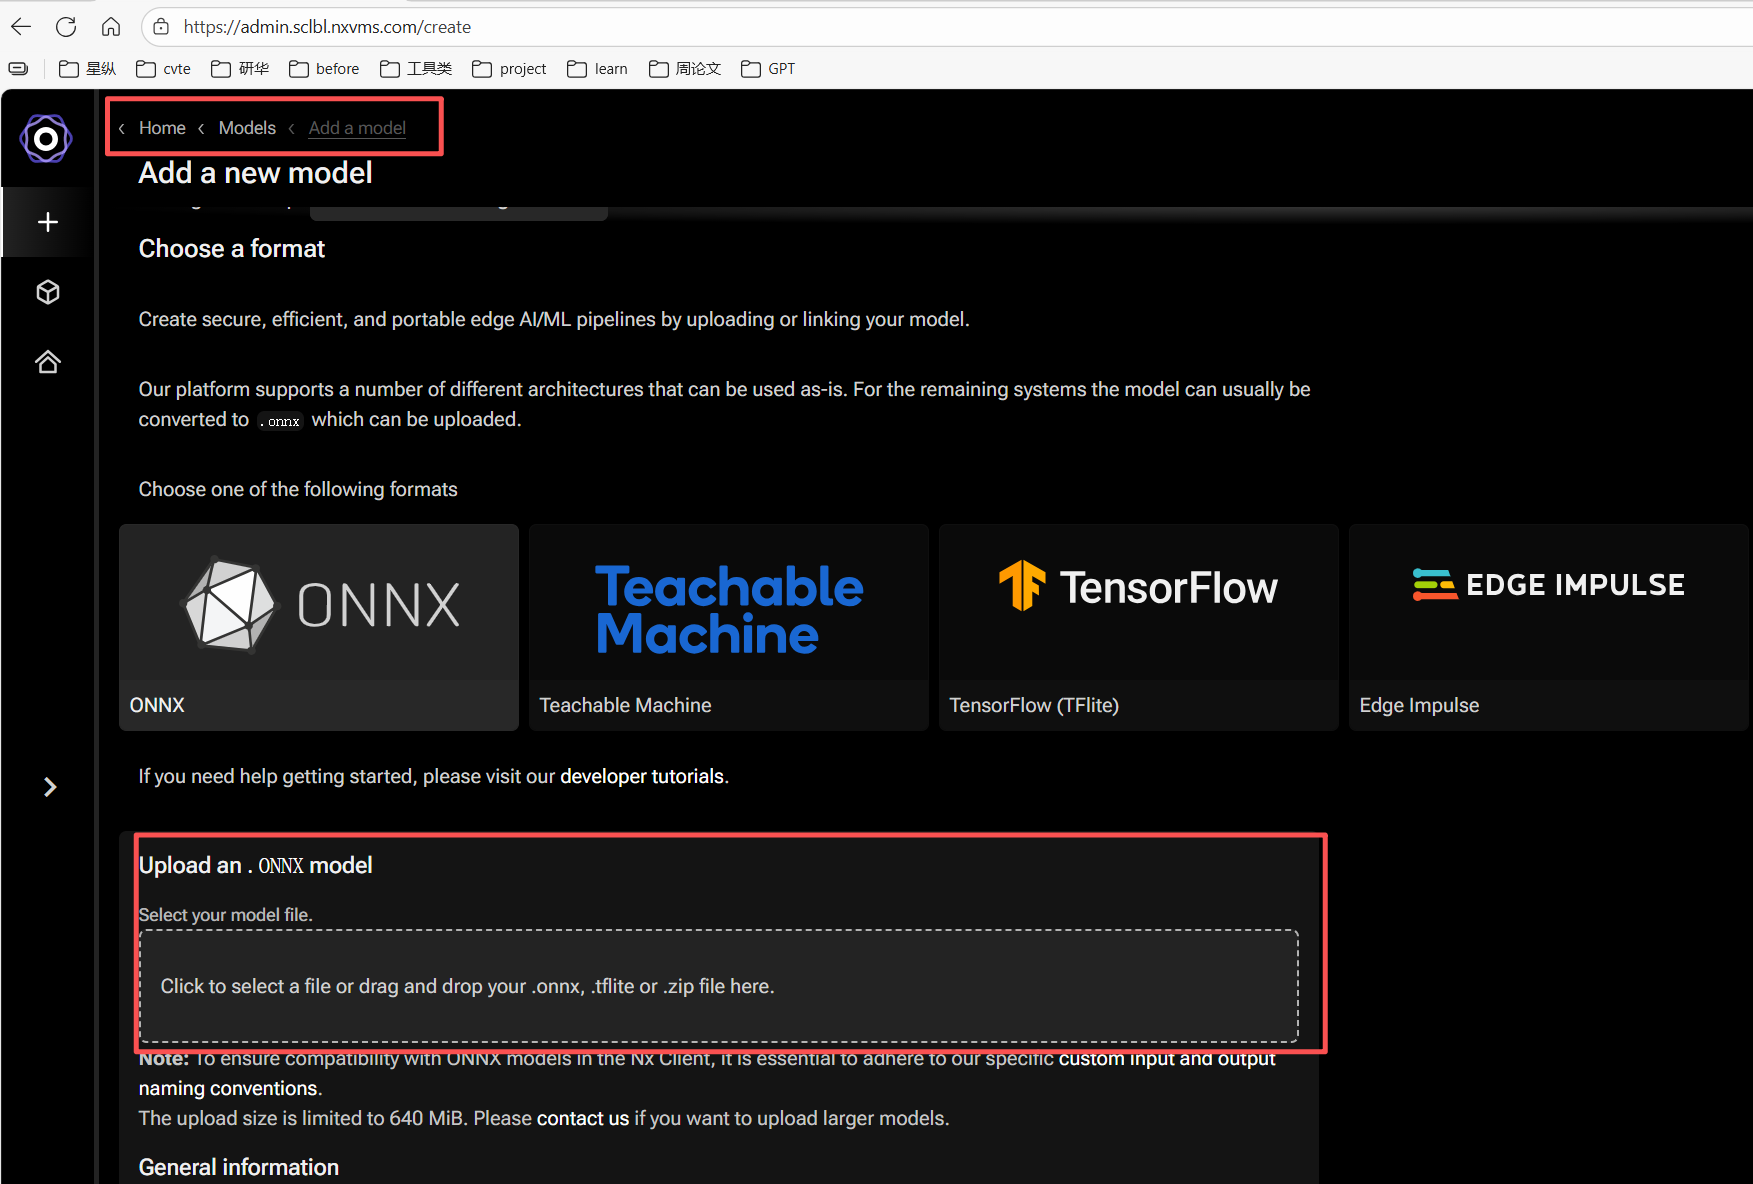
Teachable Machine is a code-free machine learning platform by Google, supporting image, audio, and pose model training. It’s easy to use and visual, supporting export to TensorFlow Lite (TFLite), TensorFlow, Keras, ONNX, and other formats for deployment on various hardware and platforms. Models trained on Teachable Machine can be quickly built and uploaded to NxMeta platform. (Reference: Teachable Machine Tutorial 1: Gather)
-
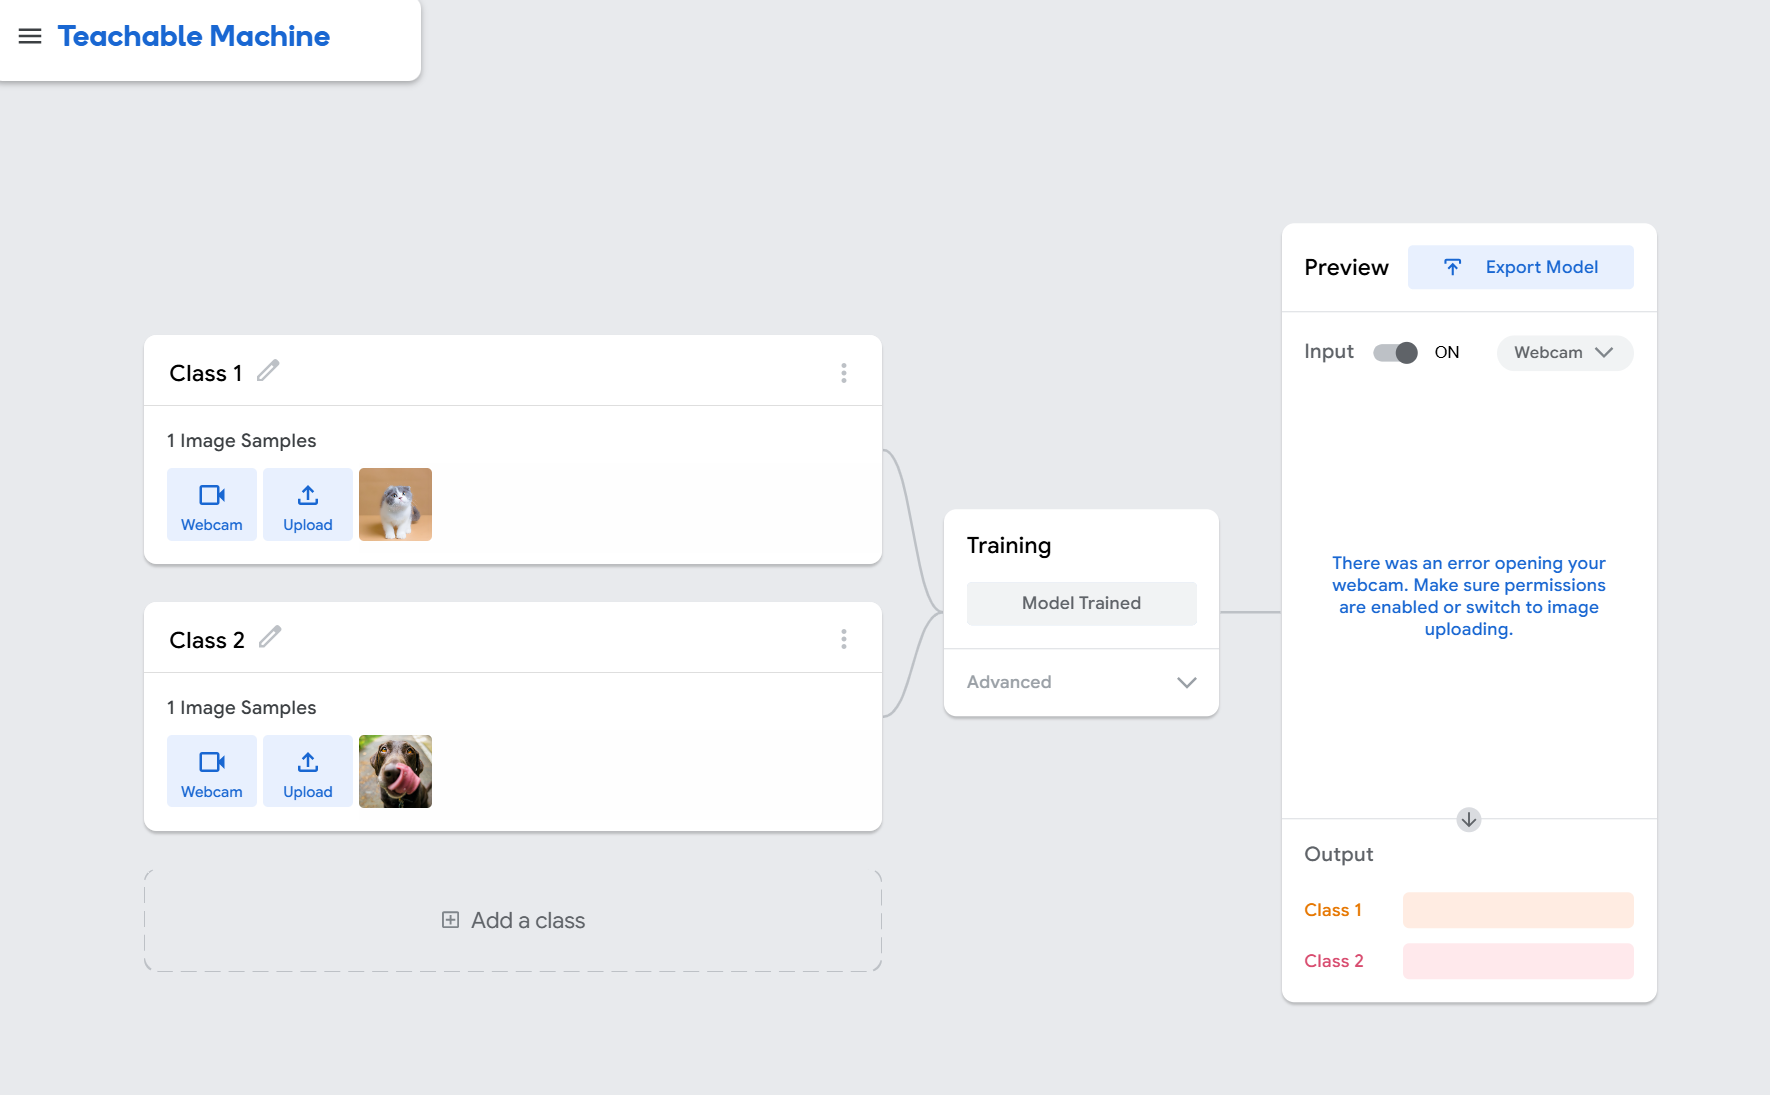
Go to the Teachable Machine website ([https://teachablemachine.withgoogle.com/]), click "New Project" to start creating a model.
-
Import sufficient images or videos, then select "Model Trained".
- Choose to export the model: select TensorFlow Lite tab -> Floating point -> Download. After downloading, you will get a zip file.
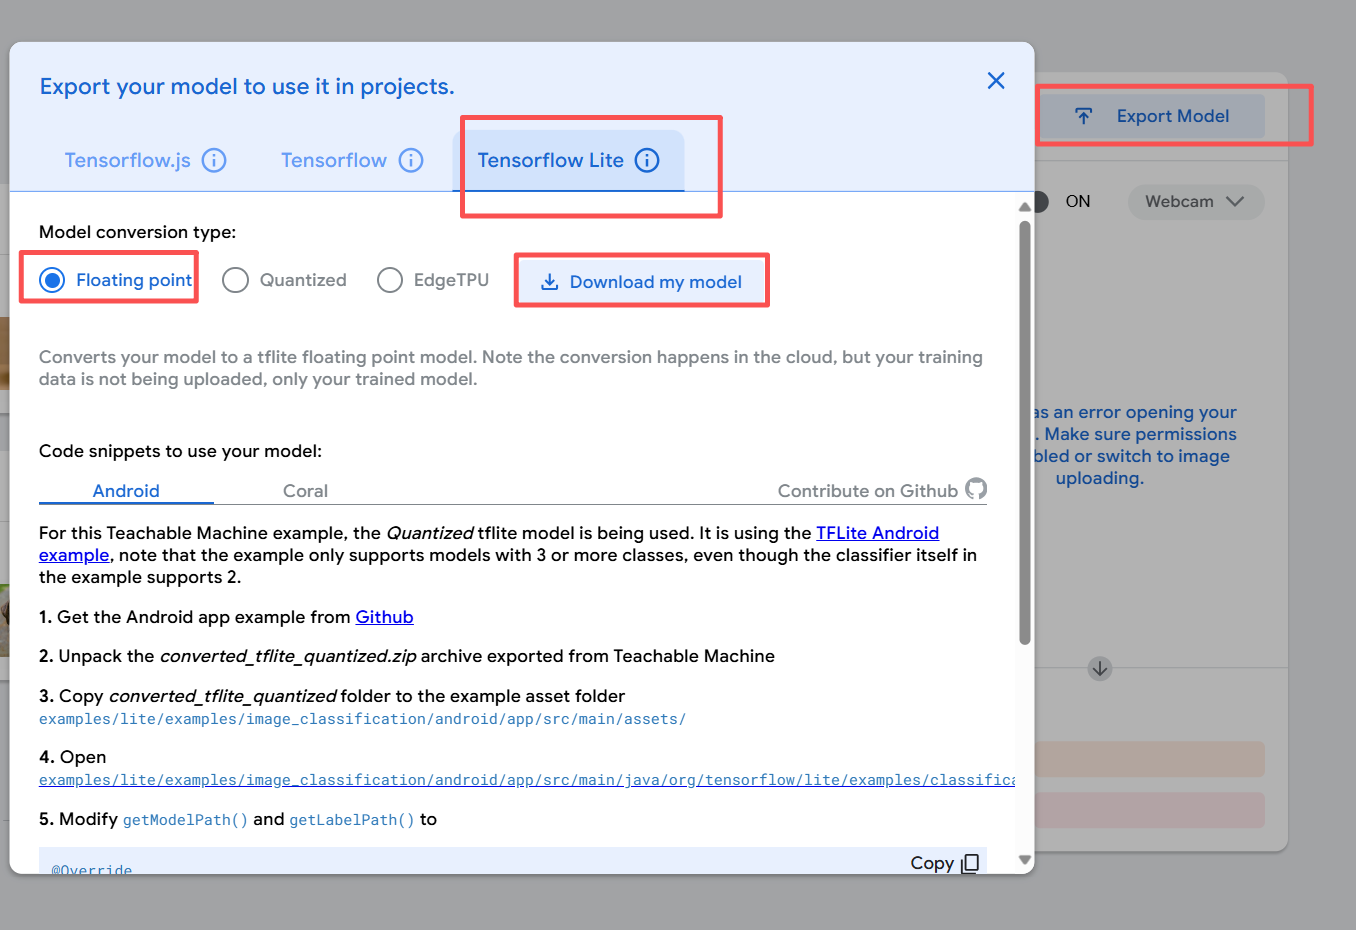
- Log in to NxMeta Cloud and upload the model by dragging the zip file.
- After successful import, you can see the uploaded model in the Plugins section of the camera configuration in the Client. Use "add pipeline" to apply the uploaded model.

5. Nx AI Manager Plugins Performance Validation
Once the platform is running Nx AI Manager Plugins stably, you can test and validate device performance as follows:
- Download the test tool:
mkdir nxai_test && cd nxai_test
wget https://artifactory.nxvms.dev/artifactory/nxai_open/NXAITest/nxai_test.tgz
tar -xvf nxai_test.tgz
- Create and activate a virtual test environment:
sudo apt install python3-venv
python3 -m venv ./
source ./bin/activate
- Install dependencies and acceleration libraries:
# Install dependencies
pip3 install -r requirements.txt

# Install acceleration library
python3 Utilities/install_acceleration_library.py
- Download test models:
python3 Utilities/download_models.py
- Testing & validation:
# Full test
python3 all_suites.py

# Hardware info
python3 Utilities/gather_hwinfo.py

# Upload results to cloud
python3 Utilities/upload_results.py
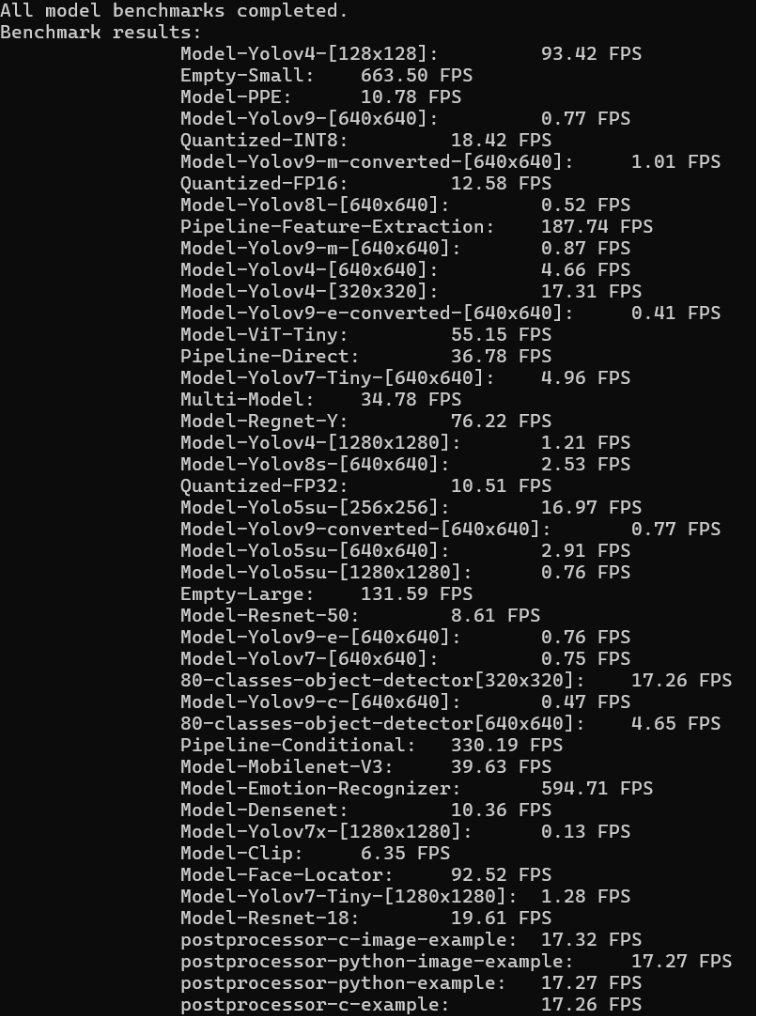
以下是个模型的输出结果:
| Model Name | Frame Rate (FPS) | Application Scenario |
|---|---|---|
| Empty-Small / Empty-Large | 663.50 / 131.59 | Performance benchmark only |
| Model-Emotion-Recognizer | 594.71 | Emotion recognition, analysis |
| Pipeline-Conditional | 330.19 | Conditional pipeline, multi-model |
| Pipeline-Feature-Extraction | 187.74 | Feature extraction, e.g. face recognition pre-processing |
| Model-ViT-Tiny | 55.15 | Image classification, lightweight vision |
| Model-Face-Locator | 92.52 | Face location, security or attendance |
| Model-Regnet-Y | 76.22 | Image classification, balance of speed and accuracy |
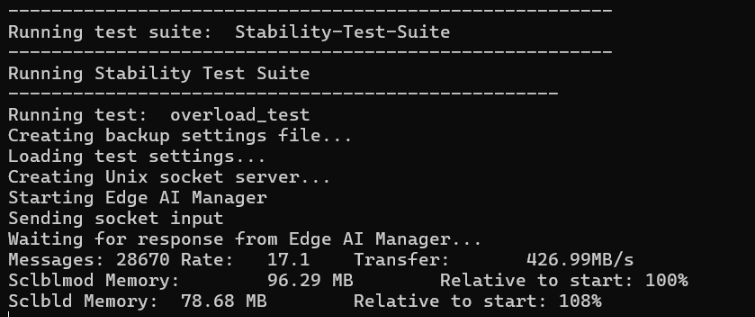
Stability test results:
● Message processing rate: 17.12 messages/sec
● Data transfer rate: 428.87 MB/s